Monday, May 30, 2011

How to add a Slider to you App and a label that displays the value of the Slider as it changes...

So we need a Action Method for the slider, sliderChanged, to receive the event. And a outlet to the label, sliderValue, to update the text according to the slider value.

Modify ImageViewViewController.h:


#import <UIKit/UIKit.h>

@interface ImageViewViewController : UIViewController {
 UILabel     *sliderValue;
}
@property (nonatomic, retain) IBOutlet UILabel *sliderValue;
- (IBAction)sliderChanged:(id)sender;
@end

Modify ImageViewViewController.m:

#import "ImageViewViewController.h"

@implementation ImageViewViewController
@synthesize sliderValue; 
- (IBAction)sliderChanged:(id)sender { 
    UISlider *slider = (UISlider *)sender; 
    NSString *newText = [[NSString alloc] initWithFormat:@"%1.2f", 
       slider.value]; 
    sliderValue.text = newText; 
    [newText release]; 
} 

- (void)didReceiveMemoryWarning {
    // Releases the view if it doesn't have a superview.
    [super didReceiveMemoryWarning];
 
    // Release any cached data, images, etc that aren't in use.
}

- (void)viewDidUnload {
 // Release any retained subviews of the main view.
 // e.g. self.myOutlet = nil;
}


- (void)dealloc {
 [sliderValue release];
    [super dealloc];
}

@end

Switch to Interface Builder to add the UI now, double click on ImageViewViewController.xib to start Interface Builder.

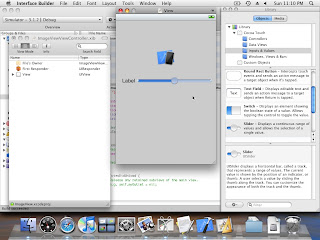
Add a Label and Slider (both from the Inputs & Values under Cocoa Touch of Library) on the View pane.
Add a Label and Slider

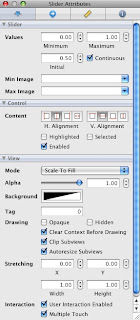
Now check the setting of the Slider: click on the Slider to select it, and click Tools -> Inspector from Interface Builder top menu.

Slider Attributes

Accept the default value of min = 0, max =1 and initial = 0.5...

Now double click on the Label to change the text to 0.5, to match with the initial value of the Slider.

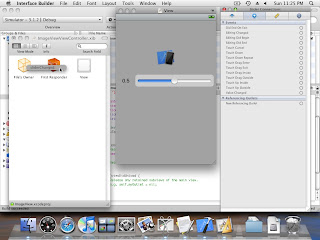
Connect the Action Method of the Slider:

click on the Slider to select it, and click Tools -> Connections Inspector from Interface Builder top menu.

Drag the circle on the right of the event Value Changed, to over File's Owner in ImageViewViewController.xib, release and select sliderChanged.
Connect the Action Method of the Slider

Connect the Action Method of the Slider

Connect the Action Method of the Slider

Connect the Outlet to the Label:

Drag the File's Owner by right button on mouse in ImageViewViewController.xib to over the Label in View. Release and select sliderValue.
Connect the Outlet to the Label

Connect the Outlet to the Label

Save your work, and Build and Run in Xcode.
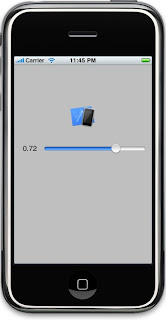
Screenshot of iPhone with a Slider

Thursday, May 26, 2011

How to install COCOS2D...

Installing Cocos2D for iPhone icon  
http://www.oscarvgg.com/installing-cocos2d-for-iphone/
 

Installing Cocos2D for iPhone

by OscarVGG on September 20th, 2010
Cocos2d for iphone is a free, fast and lightweight framework for building 2d games for iPhone, iPad and iPod Touch. It is built in objective-c and makes incredibly easier the process of making games for iOS compared to use directly OpenGL.
Before we start the tutorial you need to know that you should have a Mac computer. Developing for iOS can only be done at Apple computers. You may also know that you need to join the Apple Developer Program (it’s free) to be able to download the iOS developer tools. It all can be done at http://developer.apple.com/devcenter/ios/program/.
With that said let’s get started.
First you need to download the latest version of Cocos2d at http://www.cocos2d-iphone.org/download. At the moment i’m writing this tutorial the latest version is 0.99.4.
Once downloaded, uncompress the file.
Open up Terminal and type cd.
Installing Cocos2D for iPhone image 1
Then drag the Cocos2d folder that you just uncompressed to the terminal window.
Installing Cocos2D for iPhone image 2
Your terminal command should look like this. If so hit return, else try again.
Installing Cocos2D for iPhone image 3
Now type ./install-templates.sh -u.
Installing Cocos2D for iPhone image 4
Hit return and your installation should start. If you did everything all right your window should look like this.
Installing Cocos2D for iPhone image 5
What we did with this was installing a project template for Xcode. Now when you open Xcode you can select the cocos2d option and start working right away in a cocos2d game without having to add the necessary files every time you start a new game project.
Open Xcode. Click “Create a new Xcode project.

Sunday, May 22, 2011

How to Transfer ITunes Library to an External Drive on Mac OS X

If your hard drive is nearly full after loading all your music and other media into iTunes, or if you just want to move all those music and media files to another hard drive on your system, here's a way to make the move while retaining all your playlists, ratings, and play history.
First make sure that the "Keep iTunes Media folder organized" option is selected in iTunes Preferences:
  1. From the iTunes menu, choose Preferences.
  2. In the resulting window, click the Advanced button.
  3. Select the "Keep iTunes Media folder organized" checkbox.
  4. Click OK.

Once you've done that, follow the next set of steps to change your iTunes Media folder location to the new drive and then consolidate your library to the new location. This not only copies your audio and media files over, it also retains your ratings and playlists. Note: If you move your music and media to an external hard drive, you will need to have that drive connected to access your files. No matter what, it's always a good idea to have a backup of the media you have in iTunes.
  1. Open iTunes.
  2. From the iTunes menu, choose Preferences.
  3. Click the Advanced button in the Preferences window.
  4. Click the Change button in the iTunes Media folder location pane.
  5. In the Change Media Folder Location window that appears, navigate to the location where you would like your new iTunes Media folder to be created.
    • Note: By default, your iTunes Media folder is a folder named "iTunes Media" in ~/Music/iTunes/ where the tilde "~" represents your home directory.
  6. Click the New Folder button in the Change Media Folder Location window.
  7. In the New Folder window that appears, enter the name of the new iTunes Media folder.
  8. Click Create.
  9. Click Choose in the Change Media Folder Location window.
  10. Click OK in the Advanced window.
  11. From the File menu, choose Library and then Organize Library if using iTunes 9 or later. If you're using iTunes 7 or iTunes 8 for Mac, choose File > Library and then Consolidate Library.
  12. In the Organize Library (or Consolidate Library) window, select Consolidate files.
  13. Click OK.  Important: This action copies all of your music and media files to the new location. There must be enough hard disk space available to copy all of your music and media files.
  14. After the folder has been copied, locate your original iTunes Media folder, and drag it to the Trash. Important: Don't remove the iTunes Library files that may be in the same location as the iTunes Media folder. For more information about the iTunes Library files, see this article.
  15. Quit iTunes and then open iTunes once more.
    • If you receive the alert "The folder containing "iTunes Library" cannot be found, and is required. Please choose or create a new iTunes library," you most likely moved the iTunes Library files. If this is the case, move them out of the Trash and back to where they were.
    • If you can open and close iTunes without encountering the above alert, empty the Trash

    Note: You may want to backup the ITunes Media folder instead of just deleting it.


    Saturday, May 21, 2011

    Deminsions for Picture files

    Name Size (pixels) Platform
    Icon.png 57 x 57 Universial application icon
    Icon-settings.png 29 x 29 Universial application icon for settings area. Alternative name: Icon-Small.png
    Icon-iPad.png 72 x 72 iPad application icon. Alternative name: Icon-72.png Add some smaller (iPad doc: 64×64, other optional 32×32, 24×24, 16×16) custom icons to your project. See comments.
    Icon-iPad-spot.png 50 x 50 iPad icon for spotlight search. Alternative name: Icon-Small-50.png iPhone OS trims 1 pixel from each side and adds a drop shadow. The actual size is 48×48 pixels.
    iTunesArtwork.png 512 x 512 Universial application icon for iTunes App Store. Uploaded separately to iTunes. It’s included in the app bundle too, file name: iTunesArtwork. In an iPad application iPhone OS uses this image to generate the large (320×320) document icon if it is not supplied otherwise.
    Default.png 320 (w) x 480 (h) iPhone/iPod 2, 3 launch image
    Default-iPad.png 768 (w) x 1004 (h) iPad. Specifies the default portrait launch image. This image is used if a more specific image is not available. Use full size template (768×1024) to design this launch image. The 20 pixels height statusbar is on by default and occupies the top of the screen, aka the 1004 rows vs. 1024.
    Default4.png 640 (w) x 960 (h) iPhone 4 hi-res launch image
    Optional icons and images:
    Icon-doc.png 22 (w) x 29 (h) Universial document icon
    Icon4.png 114 x 114 iPhone 4 hi-res application icon
    Icon4-settings.png 58 x 58 iPhone 4 hi-res application icon for settings/search area
    Icon4-doc.png 44 (w) x 58 (h) iPhone 4 hi-res document icon
    Icon-iPad-doc.png 64 x 64 iPad document icon (small)
    Icon-iPad-doc320.png 320 x 320 iPad document icon (large)
    Background-xxx.png 320 (w) x 480 (h) 640 (w) x 960 (h)
    768 (w) x 1024 (h)
    iPhone/iPod Touch 2, 3 background image, iPhone 4 background image, full size
    iPad background image, full size. For most projects the status bar is hidden, so use full screen size by default.
    Default-PortraitUpsideDown.png 768 (w) x 1004 (h) iPad. Specifies an upside-down portrait version of the launch image. The height of this image should be 1004 pixels and the width should be 768. This file takes precedence over the Default-Portrait.png image file for this specific orientation.
    Default-LandscapeLeft.png 1024 (w) x 748 (h) iPad. Specifies a left-oriented landscape version of the launch image. The height of this image should be 748 pixels and the width should be 1024. This file takes precedence over the Default-Landscape.png image file for this specific orientation.
    Default-LandscapeRight.png 1024 (w) x 748 (h) iPad. Specifies a right-oriented landscape version of the launch image. The height of this image should be 748 pixels and the width should be 1024. This file takes precedence over the Default-Landscape.png image file for this specific orientation.
    Default-Portrait.png 768 (w) x 1004 (h) iPad. Specifies the generic portrait version of the launch image. The height of this image should be 1004 pixels and the width should be 768. This image is used for right side-up portrait orientations and takes precedence over the Default.png image file. If a Default-PortraitUpsideDown.png image file is not specified, this file is also used for upside-down portrait orientations as well.
    Default-Landscape.png 1024 (w) x 748 (h) iPad. Specifies the generic landscape version of the launch image. The height of this image should be 748 pixels and the width should be 1024. If a Default-LandscapeLet.png or Default-LandscapeRight.png image file is not specified, this image is used instead. This image takes precedence over the Default.png image file.

    Timbojill's Music Ear Trainer


    :

    Welcome to Timbojill's Music Ear Trainer. This app is for teaching you how to recognize notes to fun activities. There is a test and exam for this app to further teach you how to recognize notes. Feel free to e-mail me at timbojil@gmail.com with any suggestions, comments, or concerns.
    Music
    Games
    Educational
    Simulation
    Timbojill, Music, Ear, Trainer, notes, Scale, scales
    Timbojill, Inc
    romeorogerrichardson@gmail.com
    http://iphonesdk4development.blogspot.com/ 


    Monday, May 16, 2011

    How to add Muiltiple Sound buttons...

    Assuming you have the following sounds included in your apps.

    sound1.wav
    sound2.wav
    sound3.wav
    sound4.wav
    sound5.wav
    sound6.wav
    sound7.wav

    .h File for View

    #import <UIKit/UIKit.h>
    #import<AVFoundation/AVAudioPlayer.h>

    @interface buttonSoundViewController : UIViewController <AVAudioPlayerDelegate> {
        }
    -(IBAction) button1:(id)sender;
    -(IBAction) button2:(id)sender;
    -(IBAction) button3:(id)sender;
    -(IBAction) button4:(id)sender;
    -(IBAction) button5:(id)sender;
    -(IBAction) button6:(id)sender;
    -(IBAction) button7:(id)sender;

    @end

    .M File

    -(IBAction) button1:(id)sender{
       
        NSString *path = [[NSBundle mainBundle] pathForResource:@"sound1" ofType:@"wav"];
        AVAudioPlayer* theAudio=[[AVAudioPlayer alloc] initWithContentsOfURL:[NSURL fileURLWithPath:path] error:NULL];
       
        theAudio.delegate=self;
        [theAudio play];
           
        }

    -(IBAction) button2:(id)sender{
       
        NSString *path = [[NSBundle mainBundle] pathForResource:@"sound2" ofType:@"wav"];
        AVAudioPlayer* theAudio=[[AVAudioPlayer alloc] initWithContentsOfURL:[NSURL fileURLWithPath:path] error:NULL];
       
        theAudio.delegate=self;
        [theAudio play];
       
    }

    -(IBAction) button3:(id)sender{
       
        NSString *path = [[NSBundle mainBundle] pathForResource:@"sound3" ofType:@"wav"];
        AVAudioPlayer* theAudio=[[AVAudioPlayer alloc] initWithContentsOfURL:[NSURL fileURLWithPath:path] error:NULL];
       
        theAudio.delegate=self;
        [theAudio play];
       
    }

    -(IBAction) button4:(id)sender{
       
        NSString *path = [[NSBundle mainBundle] pathForResource:@"sound4" ofType:@"wav"];
        AVAudioPlayer* theAudio=[[AVAudioPlayer alloc] initWithContentsOfURL:[NSURL fileURLWithPath:path] error:NULL];
       
        theAudio.delegate=self;
        [theAudio play];
       
    }

    -(IBAction) button5:(id)sender{
       
        NSString *path = [[NSBundle mainBundle] pathForResource:@"sound5" ofType:@"wav"];
        AVAudioPlayer* theAudio=[[AVAudioPlayer alloc] initWithContentsOfURL:[NSURL fileURLWithPath:path] error:NULL];
       
        theAudio.delegate=self;
        [theAudio play];
       
    }

    -(IBAction) button6:(id)sender{
       
        NSString *path = [[NSBundle mainBundle] pathForResource:@"sound6" ofType:@"wav"];
        AVAudioPlayer* theAudio=[[AVAudioPlayer alloc] initWithContentsOfURL:[NSURL fileURLWithPath:path] error:NULL];
       
        theAudio.delegate=self;
        [theAudio play];
       
    }

    -(IBAction) button7:(id)sender{
       
        NSString *path = [[NSBundle mainBundle] pathForResource:@"sound7" ofType:@"wav"];
        AVAudioPlayer* theAudio=[[AVAudioPlayer alloc] initWithContentsOfURL:[NSURL fileURLWithPath:path] error:NULL];
       
        theAudio.delegate=self;
        [theAudio play];
       
    }


    In Interface building you have to link each button the the right function for this to work.

    Note: The first time you press a button there is a 3 second delay. After that every button you press works. please e-mail timbojill@gmail.com.